Laminate flooring installation cost in Metro Vancouver in 2026?
Fast quotes, strata-compliant sound underlayments, and careful prep for rainy coastal climates. Tell us about your space—living rooms, basements, or full condo refreshes.
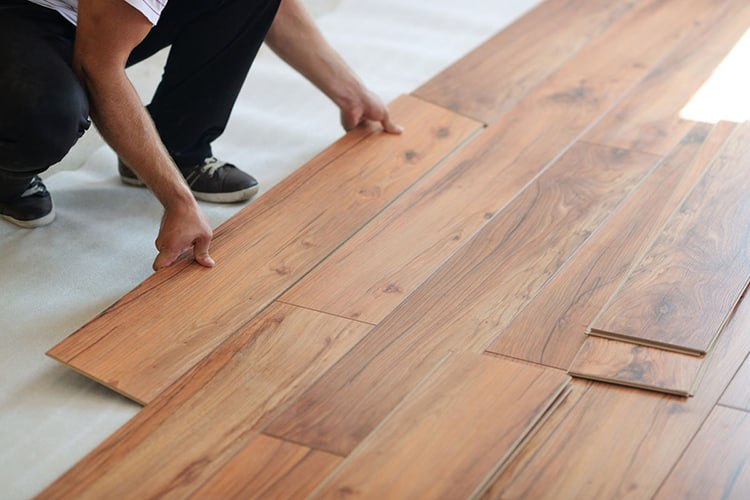
1. How much does laminate flooring cost in Metro Vancouver in 2026?
Quality laminate materials typically range from $3.50–$6.50 per sq. ft. across Vancouver, Burnaby, and Richmond, but total project cost depends on several stacked items: materials, underlayment, vapor barrier, transitions, trims, stair parts, disposal, and labor. Professional installation usually adds $2.00–$4.00 per sq. ft.; expect the higher end if your subfloor needs leveling or if you have many doorways, closets, and staircases. Premium AC4–AC5 planks with deep embossing, painted bevels, and moisture-treated cores add $0.75–$1.25 per sq. ft. yet deliver longer wear and better resale appeal. Always add 10–20% overage: 10% for straight lay in simple rectangles, up to 20% for diagonal layouts or heavily partitioned floor plans. Ask whether the quote includes furniture moves, old floor removal, and dump fees; surprises often hide there. Request line-item pricing so you can see the cost of moisture control—especially vapor barrier on slabs—and sound underlayment for condo compliance. Rudora Flooring issues written, itemized estimates that flag optional upgrades (quiet pads, stair nosings, waterproof transitions) so budgeting stays transparent.
For budgeting per room, a 300 sq. ft. condo living area using midrange boards and condo-rated underlayment often lands around $1,650–$2,300 installed. A 1,000 sq. ft. townhome with stairs, transitions to tile, and baseboard reinstallation can span $5,500–$8,000 depending on leveling. Seasonal promotions, warehouse clearances, and bulk purchases may shave 5–10%, but never sacrifice moisture protection to chase a lower headline price. In coastal climates, skipping barriers usually costs more later in repairs. See our detailed install options at Rudora Flooring and review moisture best practices from CMHC’s water-damage guide.
2. Which laminate thickness and AC rating fit our coastal humidity?
Metro Vancouver’s damp winters and shoulder seasons reward thicker, tougher planks. Aim for 8–12 mm thickness to mask minor subfloor undulations and deliver a solid, lower-hollow sound. Pair that thickness with an AC4 or AC5 wear rating: AC4 suits busy families and small retail spaces; AC5 is ideal for rentals, home offices with rolling chairs, or households with large dogs. Choose boards with waxed or silicone-treated click edges to slow moisture uptake, and look for balanced construction that keeps the board flat even after humidity swings. Embossed-in-register (EIR) textures not only look like real wood but also hide micro-scratches.
Edge sealing matters in a rainy climate: bevels with factory paint or sealant shed drips from boots and pet bowls better than raw HDF edges. When comparing specs, check swell rate tests (lower is better) and warranty fine print: some “water-resistant” labels only apply to surface spills cleaned within 24 hours. For basements or slab-on-grade spaces, thicker planks plus a robust underlayment reduce footfall noise, but do not rely on thickness alone—proper leveling and moisture control are non-negotiable. In short: 10–12 mm AC4/AC5, sealed edges, moisture-tested core, and a matching underlayment form a durable system for the Lower Mainland.
3. Do I need a vapor barrier and acoustic underlayment in condos?
Yes, on concrete slabs you need both. A 6–10 mil polyethylene vapor barrier blocks moisture migrating up from the slab—a common hidden issue in high-rises from Coal Harbour to Metrotown. Tape seams with vapor-rated tape and run the barrier 2–3 inches up walls before trimming under baseboards to create a cupped shield. On top, install an acoustic underlayment with documented IIC and STC ratings; many strata require IIC 70+/STC 70+ for hard surfaces. Combo products (barrier + pad) save height and labor and reduce the risk of trapped air pockets between layers.
Confirm your underlayment is approved for floating laminate and that its compression set won’t stress the locking system. Too-soft pads can feel plush initially but allow joints to flex and squeak. Before purchase, submit the data sheet to your strata council for pre-approval—this avoids costly tear-outs. If you’re above a mechanical room or parkade, consider a higher-spec pad to blunt low-frequency noise. Rudora routinely installs strata-compliant systems and provides IIC/STC documentation with every condo project, streamlining approvals and inspections.
4. How should I acclimate laminate planks before installation?
Proper acclimation is cheap insurance against gapping or peaking. Bring sealed boxes into the install room, lay them flat, and cross-stack to let air circulate. Maintain 18–24°C and normal household humidity for 48–72 hours—longer if the delivery was in cold weather. Do not acclimate in garages, balconies, or unheated basements; rapid temperature swings can micro-fracture the click profile. Measure subfloor moisture: wood should read under 12% on a pin meter; concrete should test under 4.5% with a calibrated meter or under 75% RH via calcium chloride/relative humidity tests. If readings are high, dehumidify or wait until levels stabilize; installing too soon voids warranties.
During acclimation, store boxes on a vapor barrier if the slab feels cool or damp to the touch. Open a few cartons and visually check tongues and grooves for shipping damage—set aside blemished boards for closets. Mark batches so color variation blends naturally across the room. When acclimation finishes, stage three to four rows near the starting wall so your workflow stays continuous and the room climate remains stable while you install.
5. What layout pattern makes small Vancouver condos look bigger?
Layout can visually stretch a space. In narrow condos, run planks parallel to the longest wall or toward the main window to draw the eye outward. Keep a 20 cm minimum stagger between end joints for structural stability and aesthetics; larger 30–40 cm staggers look even more natural with wide planks. Maintain a consistent 15 mm expansion gap around all walls, posts, and pipes—use spacers and don’t remove them until baseboards go back on. In homes with long hallways leading to open living areas (common in Kitsilano and Brentwood), start your reference line in the hallway so seams stay straight as rooms branch off, preventing “snaking” rows.
Consider a diagonal layout if you want a designer look or need to disguise out-of-square walls; budget 15–20% extra material for this. If multiple rooms connect, plan transitions at door centers to keep expansion independent and simplify future repairs. Dry-fit the first two rows to ensure your rip cuts at both starter and finish walls are at least one-third plank width—narrow slivers magnify wall waviness and look amateur. A laser line or snap line helps keep rows true on large spans. Thoughtful planning here prevents mid-room course corrections later.
6. Can laminate go on stairs, and how do I finish the nosing?
Laminate works well on stairs when detailed correctly. Use matching metal or wrapped laminate nosings designed for your plank thickness; avoid improvised trim that can flex or chip. Cut each tread and riser separately, dry-fit, then adhere with construction adhesive plus countersunk screws or brads through the nosing for safety. Keep consistent reveal across the flight and confirm finished riser heights remain code-compliant after adding underlayment (often omitted on stairs to control height). AC4–AC5 planks are recommended for impact resistance on stair traffic. Color-matched caulk along stringers and riser edges hides micro gaps and keeps debris out of joints.
Before committing, check that your laminate warranty allows stair use—some brands require glue assist on clicks for treads. If you’re unsure, let a pro handle staircase fabrication: Rudora pre-cuts nosings, numbers each tread, and installs in sequence for a continuous look without squeaks. Proper stair finishing elevates the whole project and prevents callbacks due to loose trims or noisy noses.
7. What underlayment keeps floating floors quiet in suites and duplexes?
Choose a firm, high-density pad (2–3 mm) to support the click system while damping sound. For detached homes, HD foam with integrated vapor barrier is often enough. In stacked suites, lane homes, or side-by-side duplexes, upgrade to cork or premium rubber achieving IIC/STC 70+ to tame both impact and airborne noise. Avoid “memory foam” style pads that feel cushy but compress unevenly and stress the joints. Confirm the underlayment is rated for laminate; engineered hardwood pads may be too soft or lack vapor protection.
Sound tests in the field can differ from lab numbers, so pair underlayment with careful installation: full vapor coverage, taped seams, and smooth subfloors to prevent drum effects. If you already have radiant heat, ensure the pad’s R-value is low enough to allow efficient heat transfer. Rudora selects pad thickness and density per building type, balancing acoustics, height, and manufacturer warranty requirements.
8. How do I transition laminate to tile, carpet, or vinyl cleanly?
Clean transitions protect the floating floor and sharpen the look. Use a reducer where tile sits higher; set the track so the laminate maintains its 15 mm expansion gap under the profile. For same-height surfaces like luxury vinyl, a T-molding bridges both sides evenly. At carpet, tuck and tack the carpet to a track, then drop a T-molding to lock edges without crushing fibers. Pre-drill concrete for anchors when mounting metal profiles at entries that see wet traffic—aluminum holds up better than PVC in rain.
Plan transitions at door centers so each room can move independently with humidity. If a hallway feeds multiple rooms, keep all profiles aligned for a custom built-in feel. Color-match metals or PVCs to plank tones or choose black/bronze for a modern contrast. Measure twice: uneven subfloor height differences may need feather finish or shims under the track to avoid rocking or rattling profiles.
9. Is laminate flooring truly pet-friendly for busy households?
Laminate can thrive with pets if you choose wisely and set habits. Look for matte, textured AC4/AC5 planks that hide paw prints and resist claw scratches. Micro-beveled edges mask tiny chips that may occur when toys or dishes drop. Place felt pads on furniture, add runners near patio doors, and keep nail trims regular to reduce gouging. For water bowls, use a tray or mat and wipe spills promptly; while many laminates are moisture resistant, standing water can still swell edges over time.
If you have large dogs, prioritize a dense, sealed click system and pair it with a firm underlayment to limit flex. Regular dry mopping lifts grit that can act like sandpaper under paws. In mud-prone yards, a boot/pooch station with a mat and towel at the entry will extend the life of the finish. With these steps, laminate holds up well and is easier to refresh than softer woods or thick carpets.
10. Can laminate pair safely with radiant floor heating?
Most modern laminates are rated for hydronic or electric radiant systems up to 27°C surface temperature. Float the floor—do not glue—so expansion remains free. After install, wait 72 hours, then increase heat gradually by about 5°C per day until you reach operating temp; this prevents thermal shock to the HDF core. Use a vapor barrier over hydronic slabs to block moisture vapor. Avoid thick rugs that insulate the surface and create hot spots.
Check the plank’s R-value (often 0.5–0.9); combined with underlayment, stay within your system’s design to avoid sluggish heat response. If your heating is electric mat, ensure the manufacturer allows laminate above it; some mats get hotter than rated. Keep a floor thermometer for the first week to verify temps remain within spec. Done right, radiant plus laminate delivers warm, stable floors without the dryness of forced air.
11. How do I clean laminate during a rainy Vancouver winter?
Moisture management is everything. Dry mop or vacuum with a soft-brush head three to four times weekly to remove grit and road salt. Spot clean with a lightly damp microfiber and pH-neutral laminate cleaner; avoid steam mops and oil soaps that can leave residue or force moisture into seams. Place absorbent mats at every exterior door and a boot tray to catch meltwater. In high-splash zones near sliders, re-caulk baseboard bottoms annually with paintable flexible caulk.
Rotate area rugs seasonally to prevent uneven fading, and use breathable rug pads that don’t trap moisture. If a spill occurs, wipe within minutes—most water-resistant laminates tolerate short exposure but not hours of standing liquid. For stuck-on messes, use a plastic scraper at a low angle, never metal. Simple routines like quarterly felt-pad checks and seasonal deep vacuuming keep the surface looking new for years.
12. What DIY mistakes create squeaks, gaps, or peaking later?
Common pitfalls include: skipping acclimation, installing over uneven subfloors, forgetting expansion gaps, using too-soft underlayment, and over- or under-tapping joints. A hollow or “drummy” sound often points to unaddressed low spots—fill them before laying underlayment. Peaking occurs when baseboards or kitchen islands pin the floor; the laminate must float freely with a 15 mm gap all around. Gaps appear when debris sits in the click profile or rows aren’t pulled tight with a pull bar.
Other traps: mixing batches without blending can create shade bands; running long, unbroken spans without transitions across large areas can overload expansion tolerances; and installing heavy built-ins (cabinets, islands) on top of a floating floor can lock it in place. The cure is slow prep: level the substrate, vacuum thoroughly, use spacers, check each joint as you go, and leave proper movement joints at door thresholds. If you’re unsure, have a pro inspect before you lock the final rows.
13. Should I DIY or hire a pro installer in Metro Vancouver?
DIY can save labor dollars, but the risk rises with concrete slabs, strata sound rules, stairs, and tricky layouts. A pro brings moisture meters, laser levels, tapping systems, jamb saws, and experience reading tricky walls. They also know local strata documentation requirements and which underlayments routinely pass. Rudora offers hybrid installs: we handle subfloor prep, first and last rows, doors, and stairs; you place the field boards to reduce costs while keeping warranty alignment. If your project includes radiant heat, big open spans, or requires same-day turnaround, pro installation typically pays for itself by avoiding rework and protecting manufacturer warranties.
Consider your timeline, tool access, and tolerance for learning on the job. Even a careful DIYer may spend extra on tools that a pro already owns. On the flip side, small single-room projects with simple layouts make great weekend DIY candidates. Evaluate your scope honestly, then choose the path that safeguards the finished look and long-term stability.
14. Which warranties and certifications actually matter here?
Key items: a 20–30 year residential wear warranty, explicit moisture or spill protection terms, radiant-heat approval, and edge-swell limits. Read conditions—many require immediate spill cleanup and proper vapor barriers to stay valid. For condos, IIC/STC certifications on underlayment are critical; strata may request documentation. Ask your installer for workmanship coverage that includes transitions, trims, and squeak remediation for at least 1–2 years. Keep moisture meter readings, product labels, and receipts as proof for any claim. If your space uses radiant heat, confirm both the flooring and underlayment list the same maximum temperature and assembly type.
Certifications to note: FloorScore or equivalent for indoor air quality, especially in bedrooms; fire ratings for commercial or suite entry applications; and slip ratings if you’re installing near entries. Combining the right paperwork with correct installation steps is what makes a warranty meaningful rather than marketing fluff.
15. Who installs laminate near me, and how do I book Rudora Flooring?
Rudora Flooring serves Vancouver, Burnaby, Richmond, Coquitlam, Surrey, North Vancouver, and West Vancouver with moisture-smart installs, strata-ready acoustic underlayments, precision stair work, and clean transitions. We start with a site visit to measure moisture, check levelness, and review strata rules. You’ll receive a 3D layout preview and an itemized quote covering materials, underlayment, vapor barrier, transitions, baseboards, and disposal so you know the full scope before booking. We can schedule fast-track installs for vacant units or coordinate around move-in dates for families. Ask about our hybrid DIY + pro option if you want to place planks yourself but prefer pros for prep, cuts, and finishing rows.
Call +1 (437) 335-6058 or email info@rudoraflooring.ca to reserve your date and get strata documents in order. Weekend and evening slots are available for time-sensitive turnovers. Clear communication, moisture-aware methods, and tidy jobsites are our standard practice across the Lower Mainland.
Leave a Reply